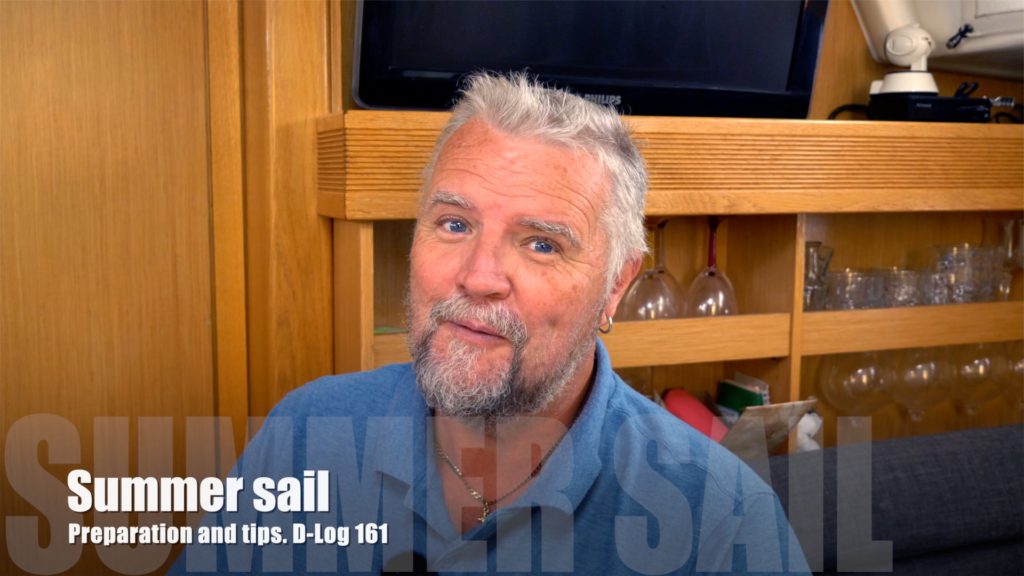
Preparing for a Summer Sail: Essential Tips for a Smooth Journey
Ahoy, sailors! 🌊⛵️
In today’s Patron only D-Log video, we’re going to help you prepare for your summer sailing adventures! We’ll cover essential tips, tricks, and safety measures to ensure you have a smooth and enjoyable experience out on the open water.
In this video, we’ll discuss:
- Essential gear and equipment you’ll need for your sailing trip 🎒⚓️
- How to plan your route and navigate safely 🗺️🧭
- Weather considerations and how to stay informed about changing conditions 🌦️🌩️
- Tips for maintaining your sailboat and keeping it in top shape 🛠️🧹
- Important safety measures and emergency procedures to keep you and your crew safe 🚨🆘
If you’d like to watch this and over 200 other Patron only videos head over to our Patron channel at Patreon.com/carlandjenny from less than the cost of a cup of coffee per month. Don’t forget to like, comment, and subscribe for more sailing tips and adventures! Hit the notification bell 🔔 to stay updated on our latest content. Let’s set sail and make this summer one to remember! ⛵️🌞🌴
Unleashing the Power of the Gennaker: A Guide to Sailing with Speed and Efficiency
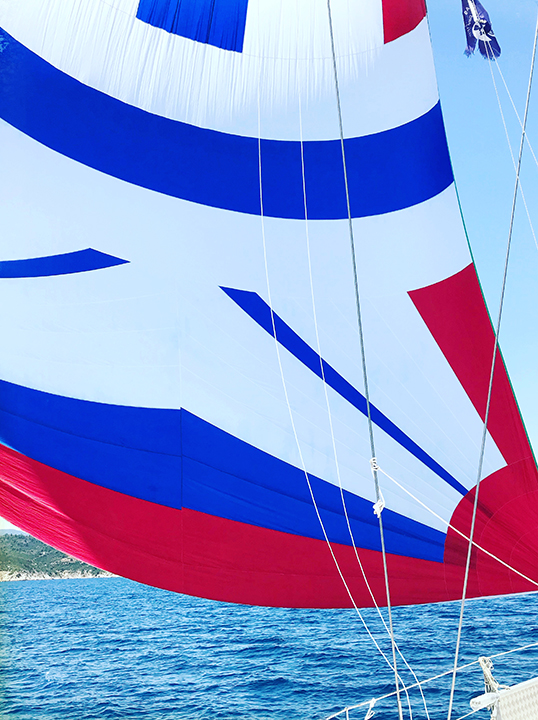
Sailing with a gennaker sail
Sailing with a gennaker sail is an exciting and rewarding experience that can add a whole new dimension to your sailing adventures. Gennakers are specialized sails that are designed for downwind sailing and can provide a significant boost in speed and power, making them a popular choice among sailors who enjoy racing or cruising.
Gennakers are often described as a hybrid between a spinnaker and a genoa. They have a larger surface area than a genoa and a flatter shape than a spinnaker, which allows them to generate lift and power in a variety of wind conditions, even when sailing downwind. Gennakers are typically asymmetric, meaning that they have a distinct leading and trailing edge. This shape allows them to generate lift and power in a variety of wind conditions, even when sailing downwind. Gennakers are also relatively flat, which helps them to maintain their shape and efficiency in light winds.
One of the primary benefits of a gennaker sail
One of the primary benefits of a gennaker sail is that it is designed to be flown in light to moderate winds, typically ranging from 5 to 20 knots. This makes it ideal for sailing in conditions where other sails may not provide enough power to maintain speed or maneuver effectively. Gennakers are also designed to be easy to handle, with a shape that allows them to be hoisted and lowered quickly and without fuss.
Sailing with a gennaker requires some specific skills and techniques, particularly when it comes to hoisting and trimming the sail. To hoist a gennaker, you’ll need to attach the halyard to the sail and raise it up the mast. As the sail rises, you’ll need to trim the sheet to ensure that the sail is properly aligned and generating the maximum amount of power.
Once the gennaker is hoisted, it’s important to trim the sail correctly to ensure that it is providing the maximum amount of power. This typically involves adjusting the sheet to control the angle of the sail relative to the wind, as well as adjusting the tack and clew to optimize the sail’s shape and efficiency.
One of the key challenges of sailing with a gennaker
One of the key challenges of sailing with a gennaker is knowing when to use it. Gennakers are designed to be used in specific wind conditions, and it’s important to know when they will be most effective. In general, gennakers are best used when sailing downwind in light to moderate winds. They can also be effective when sailing on a broad reach, although this will depend on the specific sail design and the wind conditions.
Another key consideration when sailing with a gennaker is safety. Gennakers can generate a significant amount of power, particularly in strong winds, and it’s important to know how to control the sail and manage the boat in these conditions. This may involve reducing sail area, adjusting the boat’s course, or using other techniques to manage the sail’s power and prevent accidents.
One of the most important aspects of sailing with a gennaker
One of the most important aspects of sailing with a gennaker is knowing how to trim the sail correctly. The key to getting the most out of a gennaker is to ensure that it is flying at the correct angle relative to the wind. This will typically involve adjusting the sheet to control the sail’s shape and angle of attack.
When trimming a gennaker, it’s important to keep an eye on several factors, including the sail’s luff tension, the twist of the sail, and the angle of attack. The luff tension should be adjusted to keep the sail’s leading edge straight and smooth, while the twist should be adjusted to ensure that the sail is not overpowered in strong winds. The angle of attack should be adjusted to ensure that the sail is generating the maximum amount of power without stalling.
Another important consideration when sailing with a gennaker
Another important consideration when sailing with a gennaker is boat speed. Gennakers are designed to provide a significant boost in boat speed, particularly when sailing downwind or on a broad reach. However, it’s important to keep an eye on boat speed and adjust the sail trim as necessary to maintain optimal performance.
If the boat is moving too slowly, it may be necessary to ease the sheet slightly to allow the sail to generate more power. Conversely, if the boat is moving too quickly, it may be necessary to trim the sail more tightly to reduce drag and maintain control.
Another important factor to consider when sailing with a gennaker
Another important factor to consider when sailing with a gennaker is wind direction. Gennakers are designed to be flown at specific angles relative to the wind, and it’s important to adjust the sail trim as necessary to maintain the correct angle of attack.
In general, gennakers are best flown at angles of between 90 and 135 degrees relative to the wind. This allows the sail to generate maximum lift and power while still maintaining control.
As with any sail, it’s also important to monitor the wind conditions and adjust sail trim as necessary to ensure optimal performance. This may involve adjusting the sail’s shape or angle, or it may involve changing course to take advantage of shifts in wind direction.
Sailing with a gennaker can be a challenging and rewarding experience
Sailing with a gennaker can be a challenging and rewarding experience, and it’s important to have the right skills and equipment to do it safely and effectively. If you’re new to gennaker sailing, it’s a good idea to start with smaller sails and lighter winds, and to practice hoisting and trimming the sail in a safe and controlled environment.
As you become more experienced, you can gradually increase the size of your gennaker and sail in more challenging conditions. However, it’s always important to prioritize safety and to be prepared to adjust sail trim and reduce sail area as necessary to manage the sail’s power and prevent accidents.
In conclusion, sailing with a gennaker
In conclusion, sailing with a gennaker sail is a thrilling and rewarding experience that can add a whole new dimension to your sailing adventures. Gennakers are designed to provide maximum power and efficiency in light to moderate winds, and they require specific skills and techniques to hoist and trim effectively.
If you’re interested in gennaker sailing, it’s important to start with smaller sails and lighter winds and to practice hoisting and trimming the sail in a safe and controlled environment. As you become more experienced, you can gradually increase the size of your gennaker and sail in more challenging conditions.
By mastering the skills and techniques of gennaker sailing, you’ll be able to enjoy the thrill of faster boat speeds and more efficient downwind sailing, while also ensuring the safety of yourself, your crew, and your boat.
Fair winds,
Carl and Jenny
If you enjoyed this blog post please check out our Freebies page where you can download other guides, and if you’re feeling really good consider having a look at our Support us page.
Sailor’s Guide to Business Cards: Making Waves in the Boating Community
Set sail with us on Carl and Jenny Sailing Adventures as we dive into the world of business cards for sailors!
In this video, we’ll explore creative design ideas, materials, and tips to make your sailor’s business card stand out in the boating community.
From navigating the seas of networking to making waves with eye-catching designs, we’ve got you covered. Whether you’re a seasoned sailor or just starting your nautical journey, these business card tips will help you make a lasting impression.
So where can you see this video? Well it’s over on our Patreon channel. On Patreon we post at least two videos a week giving hints and tips about the sailing life. These videos are exclusively for Patrons only. We have over 250 Patron only videos and you can watch them from less than a cup of coffee a month. If you want to subscribe to a higher tier you get more benefits, but all of our patrons get access to our D-Log and J-Log videos posted each week. Why not give it a try? Click here
Don’t forget to like, comment, and subscribe to Carl and Jenny Sailing Adventures for more sailing tips, tricks, and adventures. Join our crew and let’s sail the world together!
🔔 Hit the bell icon to get notified of our latest videos, and share this video with your fellow sailors to help them create the perfect business card. Fair winds and following seas!
The Ultimate Guide to Antifouling Your Boat: Protect, Preserve, and Perform
Let’s now discuss some additional tips and tricks to make the antifouling process even more effective:
1. Choose the right paint: Consider your boat’s material, usage patterns, and local environmental conditions when selecting an antifouling paint. This will ensure optimal protection and performance.
2. Timing is key: Plan your antifouling maintenance during the off-season or when your boat is not in use. This allows ample time for the paint to dry and cure properly before hitting the water again.
3. Safety first: Always wear protective gear, such as gloves, goggles, and a mask, when working with antifouling paints. These products contain chemicals that can be harmful if inhaled or absorbed through the skin. When rubbing down prior to painting we wear respirators and eye masks.
4. Stay eco-friendly: Opt for environmentally friendly antifouling paints whenever possible. These products are formulated with less harmful biocides and have a lower impact on marine life.
5. Monitor and maintain: Regularly inspect your boat’s hull for signs of fouling and address any issues promptly. This will help you stay ahead of potential problems and maintain optimal performance.
By following our ultimate guide to antifouling your boat, you’ll be well-equipped to protect your investment and enjoy a hassle-free boating experience. Don’t forget to subscribe to our channel for more helpful tips and tricks on boat maintenance and care.
Happy sailing!

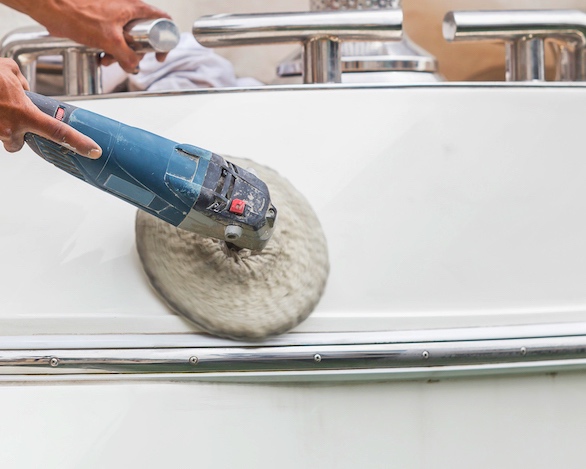
After rubbing down the hull!
The best way to clean your boat this spring
The best way to clean your boat this spring
Spring is here and it’s time to start prepping your boat for the season. Keeping your boat clean is essential for maintaining its condition and extending its lifespan. Knowing the best way to clean your boat is key for a successful clean-up. In this blog post, we’ll discuss the best way to clean your boat so you can enjoy your time on the water to the fullest.
Rinse with fresh water
The first step in keeping your boat clean is to rinse it with fresh water. This helps get rid of any dirt and debris that may be stuck on the surface of the boat. It’s best to use a garden hose or a pressure washer to get the job done. Start by spraying the boat from the bow and work your way back. Make sure to reach all of the nooks and crannies. If you are using a pressure washer, be careful as the power of the water jet can damage window seals, bearings and even the deck if you are not careful.
Scrub the hull
Once you have rinsed your boat, it’s time to get to work scrubbing the hull. Using the right soap is important when it comes to cleaning your boat. Boat soaps are specifically formulated to remove dirt, grime, and salt buildup that can damage the hull over time. When applying the soap, use a large sponge or soft brush to work it into a lather. After scrubbing the hull and all surfaces, be sure to rinse off the soap with fresh water. Make sure to use a soft-bristled brush specifically designed for use on boats. This will help ensure that you don’t damage the finish of your boat. Begin at the bow and work your way back towards the stern. Be sure to reach down into all the crevices and around all the curves of the hull. Pay special attention to any areas where dirt and grime are more prominent.
After you have completed your thorough scrubbing, rinse the boat off with fresh water again. This will help remove any soap residue as well as any debris that has been lifted by the scrubbing process. If needed, repeat this process until all debris and grime are removed from your hull.
Rinse again
After scrubbing the hull, it is important to rinse your boat again. This will help to remove any dirt or debris that may have been left behind. Start by hosing down the entire boat with the hose pipe and use a brush to remove any remaining grime. If you don’t have access to a hose, you can also use a bucket of clean water and a cloth. Focus on rinsing the boat from the stern to the bow. Once you are done, give the boat one more rinse from the bow to the stern. This will ensure that all dirt and debris are completely washed away.
Wax and polish the hull
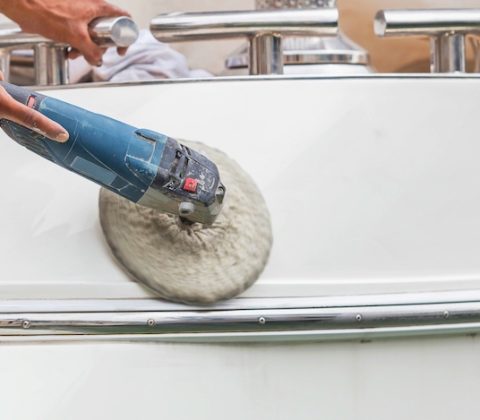
Once you have scrubbed the hull and rinsed it off, it’s time to polish the hull. The goal of polishing is to make the surface smooth and glossy. To do this, you’ll need a good quality polishing compound specifically designed for boats. Start by applying a generous amount of the compound onto a soft cloth and buffing it into the surface in circular motions. Keep working until you have reached your desired shine. When you’re done, use a clean cloth to wipe off any excess residue. Finally, rinse off the entire surface with fresh water. For buffing and final polish you can use an electric polisher. One tip if you are doing this while your boat is in the water is to tie an elastic bungay cord to your polisher and fix it on deck. That way it cannot accidentally fall in the water, and it makes it feel lighter. To give your boat a polished finish, you can use a polish specifically designed for boats. This will help protect the hull from oxidation and environmental wear and tear.
Waxing your boat’s hull will help protect it from the elements and keep it looking like new.
Before you wax the hull, you should make sure it is completely dry.
When applying the wax, start at the top of the hull and work your way down, making sure to cover all areas evenly. Using a wax applicator or soft cloth, apply a thin layer of wax in a circular motion. Work in small sections, making sure that each section overlaps slightly with the one before it.
Wait for the wax to dry before buffing it out with a soft, clean cloth. This will help to ensure that the wax is evenly spread out and will provide maximum protection.
For best results, wax your boat’s hull twice a year. This will help to maintain its appearance and protect it from the elements. With regular waxing, you can keep your boat looking like new for years to come.
So that wraps up this post. after all that hard work it’s time to sit down and have that well deserved sundowner.
Fair winds,
Carl and Jenny
If you enjoyed this blog post please check out our Freebies page where you can download other guides, and if you’re feeling really good consider having a look at our Support us page.
We got to 5000 YouTube Subscribers
We got to 5000 YouTube Subscribers
We made it! We got to 5000 YouTube Subscribers!

We are so pleased and happy this morning because we woke up to find that our subscriber count has reached 5000! We can’t believe we have come this far already.
This couldn’t have happened without you guys so a massive THANK YOU to each and every one of you for following our channel and clicking that subscribe button. It really does help our channel grow and the more views we get the more inclined we are to put out more content for you.
We have given our production side a big kick and are now putting together more content than we ever have done.
Last month we put out 8 videos on our Patreon channel. So how does that work?
To reward our Patrons we publish, for Patron’s only, a series of regular videos.
Monday we have our D-Log episode. This is where we discuss what’s been happening in real time, we put out hints and tips and it’s a place where we open up a bit more.
Wednesday we have our “Carl and Jenny Talk About” vodcast episode. This is a video version of our weekly podcast. In the podcast we talk about everything that influences our day to day living, not just sailing related. The podcast itself is available on all of the Podcast channels online in just audio format, but for Patrons only we do the video version.
Friday is when we post a regular episode that goes out on YouTube. The Patron version comes out a week earlier and is ad free during that time.
There are other rewards also available depending on what tier Patrons opt for. Any funds we raise from our Patreon channel go directly back into our film making budget, it is not supporting our lifestyle.
So if you are wanting more content for the cost of a cup of coffee, or more if you prefer 😉 then pop over to our Patreon channel for more info by clicking on the image below.

Fair winds,
Carl and Jenny
If you enjoyed this blog post please check out our Freebies page where you can download other guides, and if you’re feeling really good consider having a look at our Support us page.
Photography and Film equipment we use on board.
Photography and Filming gear we use on board
As YouTubers we need a fair amount of filming and photography equipment. We thought we would write a blog post explaining the Photography and Filming gear we use on board of Dream.
The equipment we use is what we have built up over a period of time. We were fortunate that we ran a wedding photography and film company and so had a massive amount of equipment. So much so that we had to sell quite a lot of equipment before we moved aboard as we just didn’t have room to store it all, along with the fact that we didn’t need it all any more.
We are not going to make this blog post too technical as it would go on forever. This is just to give you an idea of what we use to bring you the videos we put out.
So, lets break it up into different pieces of kit:
Filming and Photography
Panasonic Lumix GH5

This is our main camera. This camera is a micro four thirds camera, good for still photography, but a fantastic camera for film use. It’s not too heavy so its comfortable for long shoots, has all the ‘Pro’ features you need. It films in 4K which is now the standard and has more features than most people would ever need. Combined with some ‘fast’ lenses this camera takes some beating. We have pre-sets on ours that can even film in slow motion to a good standard.
Canon G7X mk2

The canon G7X is a compact camera which is easy to carry around, is self contained and comes in a small package. It has a built in lens which has a built in zoom. The great thing about this camera is that it has a screen that can be flipped up so if you are using it in selfie mode you can see what you are recording. We tend to use this camera when we are out and about. The battery life is good and can last for a full day (not continuous). This model only records in High Definition 1080, the new model records in 4K so we may have to update at some point in the future.
GoPro Hero 6 Black

The GoPro is the action camera we use. We have had this one a couple of years now which we bought to upgrade our older model, the Hero 3 Black. The battery life on the 6 is so much better. The Hero 6 Black is waterproof without having to use a special case so is ideal for boat life. Small enough to keep in your pocket and can be ready almost instantly to use. Downside is lowlight filming is a bit noisy, but the capabilities of where you can film with this camera is endless. It’s also voice activated, so you can fit it in a position where you don’t need to reach it, give it a voice command and you can film or take pictures without having to touch it.
Panasonic LUMIX DMC – FT3

This is another waterproof HD camera. No moving parts, slimline and also has a built in GPS. We don’t use the GPS. For quick, instant filming/photos, this is ideal.
DJI Osmo Pocket
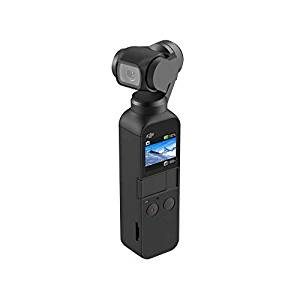
This is a new addition to our kit list. The DJI Osmo Pocket is a 4K gimballed camera that gives excellent stabilisation. Just what you need in rough seas lol! We haven’t used this yet in any of our videos but we are looking forward to using it soon.
DJI Mavic Pro Drone
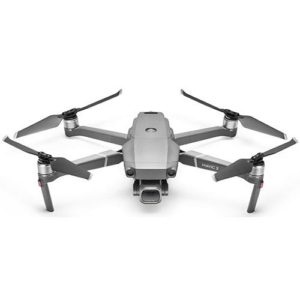
The Mavic Pro is a great Drone with some great features. We don’t use it as much as we should do and promise that next season we will be using it a lot more.
Audio
Sometimes we use external audio recording. if we have a noisy background or are further away from the camera then an external recorder and microphone is how we get around it. The other option we have is to use an external microphone on top of the LUMIX GH5.
Wireless Lavalier Microphones and receiver

The wireless mics are a great addition to the kit. We can wear these when out and about. You don’t need to be right next to the camera, you can be 100 metres away. These ensure that you capture the sound you want. You do need to connect the receiver to your camera or a seperate audio recorder, and then sync in post.

The Zoom H6 is a portable recording studio you can carry anywhere. It has built in microphones and several inputs for extra microphones, headphones or even musical instruments. It records in MP3 and wav files. The sound quality is excellent. We can use this as a standalone recorder or connect it to our computer and use it as an audio interface when recording podcasts or producing music. A great piece of kit and offers that bit more than the older H4we have.
Zoom H4 Audio Recorder

Much like the H6, the Zoom H4 is a portable recording studio you can carry anywhere. It has built in microphones and several inputs for extra microphones, headphones or even musical instruments. It records in MP3 and wav files. The sound quality is excellent. This is our older version, it still does a good job but the H6 offers a bit more.
Zoom H1 Audio Recorder

The Zoom H1 is a portable recorder. It is a one button record system. Again built in mics and a headphone socket so you can monitor your recording and a jack plug where you can plug in an external mic. This one is really small so will fit in any pocket and is easy to hide from view.
Rode Smart Lavalier Microphone.
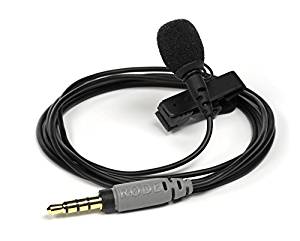
This microphone has great audio qualities. It’s very small so you don’t even know you are wearing it. It is designed to be used with the Rode recording App on an iPhone. To use it with the Zoom or other recorders you need to purchase the small adapter plug by Rode. The iPhone has 5 terminals on a jack plug and the recorders only need 4. The adapter converts it from 5 to 4 so it works correctly.
Rode VideoMic pro

This fits to the hot shoe of the GH5 camera. It requires a 9Volt battery. It plugs into the microphone socket on the camera. The downside to this mic is if you forget to switch it on, or the battery runs out you don’t get any audio recorded.
Rode Micro

Similar to the Video mic pro but does not require any power. This is ideal because you don’t have to worry about batteries or losing audio. The quality is quite good, it’s also a small convenient size and it has a ‘Dead cat’ to cut down on wind noise.
Editing
We have used different editing software packages. Adobe Premiere and Final Cut Pro X. Now we use Mac computers and Final Cut pro X for all of our editing now.

One of the reasons we no longer use Adobe as they moved over to a subscription only package.
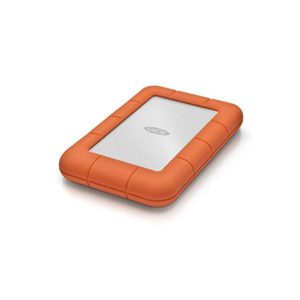
Hard Drives
We also require Hard drives for storing all the footage we record onto. The ones we use mainly for storage and editing now are the LaCie Rugged hard drives. These are shock proof and come in a nice rubber protected case.
We have quite a bit more equipment than this, extra camera bodies, desk mics, lights etc etc. Not to mention all the spare batteries, memory cards, mounts, tripods, monopods. The list goes on.
If you enjoy watching our videos and would like to help support the production of them you can become a Patron by clicking on this LINK. as a Patron you get access to lots of extra videos and other perks depending on what tier you join. There is a tier for everyone.
If you click on any of the links of the equipment we have featured and order anything from Amazon, we get a small commission from amazon at no extra cost to you. It just puts a few coppers into our Amazon affiliate account, which we use to upgrade and replace the equipment we use for filming. If you have any questions about any of the kit we use please comment below and we will get back to you as soon as we can.
Fair winds,
Carl and Jenny
If you enjoyed this blog post please check out our Freebies page where you can download other guides, and if you’re feeling really good consider having a look at our Support us page.
Cruising life starts again this week
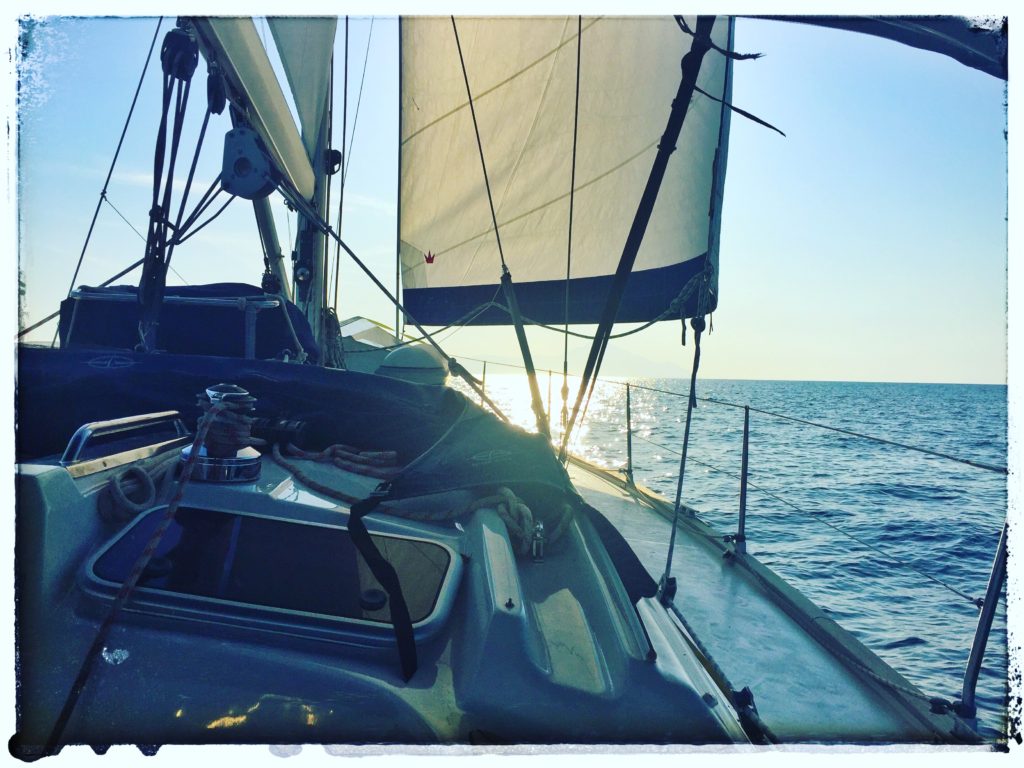
Sailing in Greece
Cruising life starts again this week
At last cruising life starts again this week on SV Dream.
Last month Jen flew back to England to help our daughter move into her new home. We agreed for me to stay here to get a few jobs done on the boat. Our daughter was supposed to have got the keys to the house a couple of days before Jen was arriving, unfortunately there was a delay so no work was being done.
As a surprise, I booked a flight for the following Saturday and turned up unannounced to the delight of everyone. It was a good job because there was so much work that needed doing to the house in addition to painting.
My job’s included, plastering a wall, fitting wall tiles in the kitchen, floor tiles in the bathroom, replacing light fittings and plug sockets and a few other jobs that they wouldn’t have been able to do. We enjoyed our time and even got chance to take a couple of two night breaks away in our camper van.
Back in Crete
So we are now back on the boat and getting ready to set off this week. Looking at the weather window it looks like Thursday morning will be the day to leave the marina. We are still getting the force of the Meltemi winds which are anywhere between 20-38 knots even in the marina. Our plan is to sail to an anchorage a couple of hours away for the shakedown sail, spend a few days there, clean the bottom of the boat and then set off after the weekend for the Dodecanes or Cyclades depending on the most favourable wind direction. If you wonder what weather forecasting software we use here are the 3 main ones, Predict wind Windytv.com windy.app
We are really looking forward to getting back out there on the sea. It seems like a lifetime ago since we were coming back to Crete for the winter, but then again it was 10 months ago! At least we can get out this year. We had written any chance of cruising off this year because of the pandemic, let’s all hope that it will soon pass and things get back to normal.
I saw this quote recently and thought it fit our lifestyle and that I would share it.
Quote
“Can you believe that 5 years ago, I used to wear suits everyday!? It’s pretty funny, because now I have a hard time getter over having to wear shoes! It’s interesting how you connect with your environment and nature when you get to see, live it and eat it.
Life is not about how busy you are, it’s all about the intense moments, real friendship, love, skinny dipping and the crazy stories you get to take away when you’re old.”
Fair winds,
Carl and Jenny
If you enjoyed this blog post please check out our Freebies page where you can download other guides, and if you’re feeling really good consider having a look at our Support us page.
An update on this years sailing season
Well firstly we must apologise for the gap in updating our blog page. To be honest and frank, we didn’t think it appropriate to be posting about us while the world has been put on hold. We have paused our regular videos on YouTube (although our Patron only videos have still being going out), but now we think it’s about time we can start posting them again, now that the world is getting back to a bit of normality, albeit, still a different one to that which we had become accustomed to.
So what’s happening aboard Dream, I hear you say!
Well throughout the lockdown period we had been fostering a beautiful dog, Sam, who was waiting for the lockdown to lift so that he could be flown to his forever home in the UK. We became quite attached to him, and in all honesty, if we weren’t planning on sailing we would have kept him. The lockdown lifted for sailing in Greece came at the beginning of June, however Sam’s flight was booked for the 15th, assuming they were going to fly then. We decided that rather than him have to go into another foster home we would stay and look after him until then.
Two days before he was due to leave the couple who were going to have him pulled out. Now there is a waiting list for the dogs that are rescued here so rehoming him was never going to be a problem, however the 15th came and went. It wasn’t until the 27th June that we finally had to say goodbye to this lovely companion who turned out to be one of the most loyal, faithful and loving dogs we have had. After a lump in throat farewell we could get back to our sailing plans.
Sailing Plans
We needed a few days to get the boat transferred from its ‘winter living in the marina’ mode to “I’m a sailboat lets go” mode. Most of the jobs were done, just an engine oil change, a bit more fuel and some supplies and we could be off. Oh, not forgetting paying the dreaded TEPAI cruising tax and fetching our ship papers from the Port Police.
29th June and the TEPAI tax was paid online, the marina office printed off a hard copy of our receipt which we could present to the Police in order to get our papers back. 1st July, trip to the port Police, 10 minutes later we had our papers and were legally set to go.
I needed to complete the oil, filter and fuel filter service prior to leaving. Oil and oil filter done, engine started to run it through the engine and that is where the problem started. The revs started hunting up and down, there was a cloud of white smoke and then the engine stopped and refused to restart!
Now from my limited mechanic skills, I was adamant it was nothing I had done, or related to the oil change. I hadn’t started on the fuel system but I thought that it was a fuel starvation problem or contaminated fuel. The fact the smoke was white and not black indicated fuel issues. I removed the primary fuel filter, and there in the bottom of the collection chamber was what every sailor dreads, the signs of diesel bug. It’s actually a living organism that grows in the water content in the diesel, has a snot like consistency and doesn’t do your fuel system any favours. So all indications were that our fuel was contaminated.
Off to the chandlers where we purchased a 12v pump and a fuel polishing filter and some hose. Next we had to find enough jerry cans to empty our fuel tank. Two days later, the fuel had been emptied, cleaned and polished and was looking good. A check of the interior of the tank was pleasing, NO BUG! It looks like that the only bit of bug we had was in the bottom of the primary fuel filter casing. The fuel was returned to the tank. With new fuel filters fitted and the system bled we should be good to go. Ignition on, starter engaged……………Not starting. Try again…….nothing. Fuel was getting to the high pressure pump but no further!
The following day I spoke with a local mechanic who said it could be the high pressure fuel pump that was blocked. Specialist tools required, testing etc = big bill. And if it needed replacing €2776.00!!! What?
As luck would have it the following morning a boat near to us which had been vacant all winter had someone moving around. A neighbour mentioned they’d heard the owner was a mechanic. The sun was shining that day, yes he was a diesel mechanic with 30yrs experience under his belt. An hour later he was up to his armpits sucking diesel, blowing here, fiddling with that etc.
The diagnosis was hat the fuel lift pump was not delivering enough fuel and that a replacement would be required. I went online and found a place, not far from where we lived in the UK that had the part. A quick phonecall, a credit card and it was on its way. Only problem was it would take up to two weeks to arrive. No problem, we could get everything else ready to go.
That night we received a family phone call, without going into details here, we had to make a decision. Jen was booking a flight to return to the UK for almost 4 weeks, the longest time we would have to spend apart since we met when we were 16 and 18yrs old. Not something we were looking forward to but needs must.
The earliest flight was booked and we decided I would stay with the boat so when the new part arrives I can do the repair so when Jen returns in August we can more or less set off sailing straight away.
So, that’s where we are to date. I’m sat here on the boat doing a few little jobs and Jen is back in the UK with family. It feels really strange being apart but it’s only for a short time and sometimes you have to put other people’s needs before your own. I can’t wait for her to get back though.
If you enjoyed this blog post please check out our Freebies page where you can download other guides, and if you’re feeling really good consider having a look at our Support us page.
Friday podcast
Welcome to the Friday Podcast.
Welcome to the Friday Podcast. Well our podcasts are rolling out now, we are trying for two a week, one on a Monday and one on a Friday.
We are having a lot of fun recording them but could do with a few ideas on topics to cover, that’s where we could do with your help. Comment below, leave a comment on our Carl and Jenny Talk About Facebook page or just email us. Ask us a question or suggest a topic. We’ll be sure to answer everything.
As from next Friday the podcasts will also be available in video form so you can see behind the scenes of how a podcast is made.
Benefits for you:
Listen anywhere on your travels via podcast players
Watch the video when you can for a different experience.
Anyway, here’s todays episode. Hope you enjoy it.
If you enjoyed this blog post please check out our Freebies page where you can download other guides, and if you’re feeling really good consider having a look at our Support us page.